

How To Display Images In A Crud Mern App
React CRUD is an essential operation to learn React.js for Beginners. We will learn how to build a small web application that creates, read, update, and delete data from the MongoDB database step by step from scratch. Finally, we will build the MERN Stack web application.
We are calling React CRUD app to MERN Stack application because we are using MongoDB, Express, React, and Node.js tech stack. So this article will show you the steps to create an app where the user can create new business, fetch that business, edit business, and delete business using React.js.
What is React?
React.js is UI Library and not a complete framework like Angular. React is the JavaScript library for building user interfaces.
It is maintained by Facebook, Instagram, and a community of individual developers and corporations. You can find its official documentation here.
React is also most generally associated with JSX, even though it's possible to use React without JSX. JSX lets you mix HTML in with your JavaScript rather than using templates to define the HTML and binding those values to a view model, and you can write everything in JavaScript.
Values can be plain JavaScript objects rather than strings that need to be evaluated.
You can also write reusable React components that look like any other HTML element in your code.
Why use React?
There area lot of JavaScript frameworks out there today. It seems like I hear about a new one every month or so.
They all have their advantages and are usually there to solve some problems with an existing framework.
One of the best things is how many open source components and libraries there are in the React ecosystem, so you have a lot to choose from.
This can be difficult if you're indecisive, but if you like the freedom to do things your way, then React may be the best option for you.
React.js allows us to express how our app should look at any given point in time. In addition, react will automatically manage all UI updates when your underlying data changes.
When the data changes, React conceptually hits the "refresh" button and knows only to update the changed parts. The main reason to use React for your next project is the following.
- Fast Learning Curve.
- Reusable Components.
- Fast render with Virtual DOM.
- Clean Abstraction.
- Redux: A State Management Library For Complex UIs.
- Great Developer Tools.
- React Native: You can build a cross-platform native mobile application for Android or iOS.
Who uses React?
Aside from Facebook and Instagram, many well-known companies use React, including Dropbox, PayPal, Netflix, Airbnb,and many more.
Tech specs
We will use the following Technologies with its version.
- macOS (Mojave)
- Node v10.11.0
- NPM v6.4.1
- MongoDB shell versionv3.6.3
- MongoDB versionv3.6.3
- React.js version 16.6.1
Steps to build React CRUD Example
To follow along with this tutorial, you'll need a basic knowledge of HTML, CSS, and JavaScript/ES6. In addition, you should also know very basic about React.js.
Create a new React app using the following command.
Step 1: Install React Application
npx create-react-app reactcrud cd reactcrud npm start

If you are facing any issue with compiling, please create a .envfile on the root and add the following line of code.
SKIP_PREFLIGHT_CHECK=true
Go to this URL:http://localhost:3000/
Now, install the Bootstrap 4 Framework using the following command.
yarn add bootstrap # or npm install bootstrap --save
Import the Bootstrap CSS Framework inside our project.
Modify the code inside thesrc >> App.jsfile.
// App.js import React, { Component } from 'react'; import 'bootstrap/dist/css/bootstrap.min.css'; class App extends Component { render() { return ( <div className="container"> <h2>React CRUD Tutorial</h2> </div> ); } } export default App; Save the file and go to the browser, and you can see that we have successfully integrated bootstrap 4 in our react application.
Step 2: Configure React routing
Type the following command to install thereact- router-dom module. If you want to find more information aboutthe react-router-dommodule, then you can follow this documentation.
yarn add react-router-dom # or npm install react-router-dom --save
Go to theindex.jsfile and Wrap theBrowserRouter object around theApp.js component.
// index.js import React from 'react'; import ReactDOM from 'react-dom'; import { BrowserRouter } from 'react-router-dom'; import App from './App'; import * as serviceWorker from './serviceWorker'; ReactDOM.render( <BrowserRouter> <App /> </BrowserRouter>, document.getElementById('root')); serviceWorker.unregister(); Now, create three components.
Inside the srcfolder, create one directory calledcomponents, and inside that folder, make three components.
- create.component.js
- edit.component.js
- index.component.js
// create.component.js import React, { Component } from 'react'; export default class Create extends Component { render() { return ( <div> <p>Welcome to Create Component!!</p> </div> ) } } // edit.component.js import React, { Component } from 'react'; export default class Edit extends Component { render() { return ( <div> <p>Welcome to Edit Component!!</p> </div> ) } } // index.component.js import React, { Component } from 'react'; export default class Index extends Component { render() { return ( <div> <p>Welcome to Index Component!!</p> </div> ) } } Now, add the navigation bar in our React CRUD example. Then, write the following code inside the App.jsfile.
// App.js import React, { Component } from 'react'; import 'bootstrap/dist/css/bootstrap.min.css'; import { BrowserRouter as Router, Switch, Route, Link } from 'react-router-dom'; import Create from './components/create.component'; import Edit from './components/edit.component'; import Index from './components/index.component'; class App extends Component { render() { return ( <Router> <div className="container"> <nav className="navbar navbar-expand-lg navbar-light bg-light"> <Link to={'/'} className="navbar-brand">React CRUD Example</Link> <div className="collapse navbar-collapse" id="navbarSupportedContent"> <ul className="navbar-nav mr-auto"> <li className="nav-item"> <Link to={'/'} className="nav-link">Home</Link> </li> <li className="nav-item"> <Link to={'/create'} className="nav-link">Create</Link> </li> <li className="nav-item"> <Link to={'/index'} className="nav-link">Index</Link> </li> </ul> </div> </nav> <br/> <h2>Welcome to React CRUD Tutorial</h2> <br/> <Switch> <Route exact path='/create' component={ Create } /> <Route path='/edit/:id' component={ Edit } /> <Route path='/index' component={ Index } /> </Switch> </div> </Router> ); } } export default App; Save the file and go to the browser.

Step 3: Create the bootstrap form
Write the code to generate the bootstrap form inside thecreate.component.jsfile.
// create.component.js import React, { Component } from 'react'; export default class Create extends Component { render() { return ( <div style={{marginTop: 10}}> <h3>Add New Business</h3> <form> <div className="form-group"> <label>Add Person Name: </label> <input type="text" className="form-control"/> </div> <div className="form-group"> <label>Add Business Name: </label> <input type="text" className="form-control"/> </div> <div className="form-group"> <label>Add GST Number: </label> <input type="text" className="form-control"/> </div> <div className="form-group"> <input type="submit" value="Register Business" className="btn btn-primary"/> </div> </form> </div> ) } } 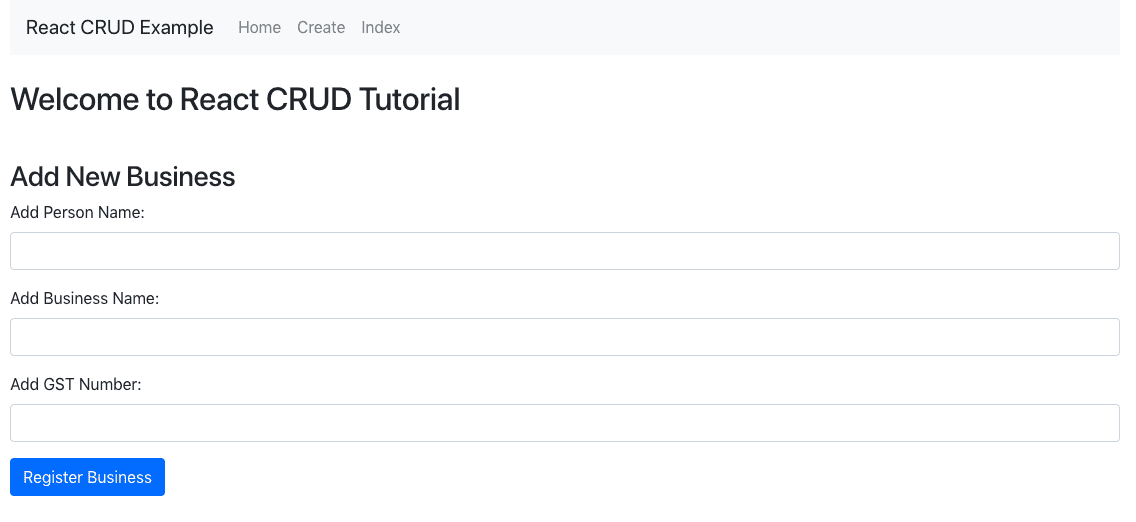
Step 4: Submit the Form
Okay, now we have three fields.
- person name
- business name
- gst number
So we need to create four functions that can track the values of the textbox and set that state according to it. Also, the fourth function will send the POST request to the node express server.
Now, first, we will define the constructor and set the initial state, and then also bind this to the different events inside the constructor.
Then define the different functions with each input text value. So when the user types inside the textbox, we set the state according to it.
So, let say the user is typing the person's name inside the textbox; we are changing the state value of the person's name. Then, finally, the same for all of the inputs, and when we submit the form, we get the values from the state and send them to the POST request.
// App.js import React, { Component } from 'react'; export default class Create extends Component { constructor(props) { super(props); this.onChangePersonName = this.onChangePersonName.bind(this); this.onChangeBusinessName = this.onChangeBusinessName.bind(this); this.onChangeGstNumber = this.onChangeGstNumber.bind(this); this.onSubmit = this.onSubmit.bind(this); this.state = { person_name: '', business_name: '', business_gst_number:'' } } onChangePersonName(e) { this.setState({ person_name: e.target.value }); } onChangeBusinessName(e) { this.setState({ business_name: e.target.value }) } onChangeGstNumber(e) { this.setState({ business_gst_number: e.target.value }) } onSubmit(e) { e.preventDefault(); console.log(`The values are ${this.state.person_name}, ${this.state.business_name}, and ${this.state.business_gst_number}`) this.setState({ person_name: '', business_name: '', business_gst_number: '' }) } render() { return ( <div style={{ marginTop: 10 }}> <h3>Add New Business</h3> <form onSubmit={this.onSubmit}> <div className="form-group"> <label>Person Name: </label> <input type="text" className="form-control" value={this.state.person_name} onChange={this.onChangePersonName} /> </div> <div className="form-group"> <label>Business Name: </label> <input type="text" className="form-control" value={this.state.business_name} onChange={this.onChangeBusinessName} /> </div> <div className="form-group"> <label>GST Number: </label> <input type="text" className="form-control" value={this.state.business_gst_number} onChange={this.onChangeGstNumber} /> </div> <div className="form-group"> <input type="submit" value="Register Business" className="btn btn-primary"/> </div> </form> </div> ) } } Step 5: Create a backend on Node.js
Now, we will create a backend API in Node, Express, and MongoDB.
Inside ourreactcrudproject root, create one folder called api and go inside that folder and initialize thepackage.jsonfile.
npm init -y
Now, install the following node.js dependencies.
yarn add express body-parser cors mongoose # or npm install express body-parser cors mongoose --save
Also, install thenodemonas a development dependency. So that we do not need to restart every time we change our server code.
npm install nodemon --save-dev
Now, inside theapifolder, create one file called theserver.jsand add the following code.
// server.js const express = require('express'); const app = express(); const bodyParser = require('body-parser'); const PORT = 4000; const cors = require('cors'); app.use(cors()); app.use(bodyParser.urlencoded({extended: true})); app.use(bodyParser.json()); app.listen(PORT, function(){ console.log('Server is running on Port:',PORT); }); Save the file and open a new tab terminal inside theapifolder, and hit the following command to spin up the node.js server.
nodemon server
You can see inside the terminal that our node.js server is running.

Step 6: Setup a MongoDB database
If you are a beginner in the MongoDB database, then please check out the below tutorial.
Related Post:NoSQL MongoDB Tutorial
I have already installed MongoDB on Mac.So I am starting theMongoDB server by the following command.
mongod
Inside theapifolder, create one file called DB.jsand add the following line of code.
// DB.js module.exports = { DB: 'mongodb://localhost:27017/reactcrud' } In my local MongoDB database, the username and password are empty, but in the production, you need to create one admin user and assign the database to that user.
Now, import this DB.js file into the server.jsfile.
// server.js const express = require('express'); const app = express(); const bodyParser = require('body-parser'); const PORT = 4000; const cors = require('cors'); const mongoose = require('mongoose'); const config = require('./DB.js'); mongoose.Promise = global.Promise; mongoose.connect(config.DB, { useNewUrlParser: true }).then( () => {console.log('Database is connected') }, err => { console.log('Can not connect to the database'+ err)} ); app.use(cors()); app.use(bodyParser.urlencoded({extended: true})); app.use(bodyParser.json()); app.listen(PORT, function(){ console.log('Server is running on Port:',PORT); }); Save the file, and you can see inside the terminal that our node.js application is connected to a MongoDB database.
Step 7: Create a Mongoose Schema
The next step is that we need to create a schema for the MongoDB database. For that, create a file inside the api project root called business.model.jsand add the following code.
// business.model.js const mongoose = require('mongoose'); const Schema = mongoose.Schema; // Define collection and schema for Business let Business = new Schema({ person_name: { type: String }, business_name: { type: String }, business_gst_number: { type: Number } },{ collection: 'business' }); module.exports = mongoose.model('Business', Business); We have taken three fields calledperson_name, business_name,andbusiness_gst_number, with their data types.
Step 8: Define the route for the Node.js Express application
Write the CRUD code inside thebusiness.route.jsfile.
// business.route.js const express = require('express'); const businessRoutes = express.Router(); // Require Business model in our routes module let Business = require('./business.model'); // Defined store route businessRoutes.route('/add').post(function (req, res) { let business = new Business(req.body); business.save() .then(business => { res.status(200).json({'business': 'business in added successfully'}); }) .catch(err => { res.status(400).send("unable to save to database"); }); }); // Defined get data(index or listing) route businessRoutes.route('/').get(function (req, res) { Business.find(function(err, businesses){ if(err){ console.log(err); } else { res.json(businesses); } }); }); // Defined edit route businessRoutes.route('/edit/:id').get(function (req, res) { let id = req.params.id; Business.findById(id, function (err, business){ res.json(business); }); }); // Defined update route businessRoutes.route('/update/:id').post(function (req, res) { Business.findById(req.params.id, function(err, business) { if (!business) res.status(404).send("data is not found"); else { business.person_name = req.body.person_name; business.business_name = req.body.business_name; business.business_gst_number = req.body.business_gst_number; business.save().then(business => { res.json('Update complete'); }) .catch(err => { res.status(400).send("unable to update the database"); }); } }); }); // Defined delete | remove | destroy route businessRoutes.route('/delete/:id').get(function (req, res) { Business.findByIdAndRemove({_id: req.params.id}, function(err, business){ if(err) res.json(err); else res.json('Successfully removed'); }); }); module.exports = businessRoutes; Here, we have defined the CRUD operations for MongoDB. So when the request hits the server, it maps the URI, and according to URI, the above function will be executed, and a database operation will be performed and send the response to the client.
Here, we have used a Mongoose ORM to save, update, delete the data from the database. Mongoose is anORM used in the MongoDB database. We have all the CRUD operations set up on the route file; we need to import them inside the server.jsfile.
So, our finalserver.jsfile looks like this.
// server.js const express = require('express'); const app = express(); const bodyParser = require('body-parser'); const PORT = 4000; const cors = require('cors'); const mongoose = require('mongoose'); const config = require('./DB.js'); const businessRoute = require('./business.route'); mongoose.Promise = global.Promise; mongoose.connect(config.DB, { useNewUrlParser: true }).then( () => {console.log('Database is connected') }, err => { console.log('Can not connect to the database'+ err)} ); app.use(cors()); app.use(bodyParser.urlencoded({extended: true})); app.use(bodyParser.json()); app.use('/business', businessRoute); app.listen(PORT, function(){ console.log('Server is running on Port:',PORT); }); Save the file and see the terminal and check if we got any errors.
Step 9: Install the Axios library and send a POST request.
Install theAxios libraryand send thePOSTrequest. If you want to learn about the Axios library, check out my Getting Started With Axios Promise Based HTTP Client Tutorial Examplearticle.
yarn add axios # or npm install axios --save
Now, send the HTTP POST request along with the form data to thenode js server. We will send the data as an object because we have used the body-parser at the backend to pluck the data from the request and save it in the database.
Write the following code inside thecreate.component.jsfile.
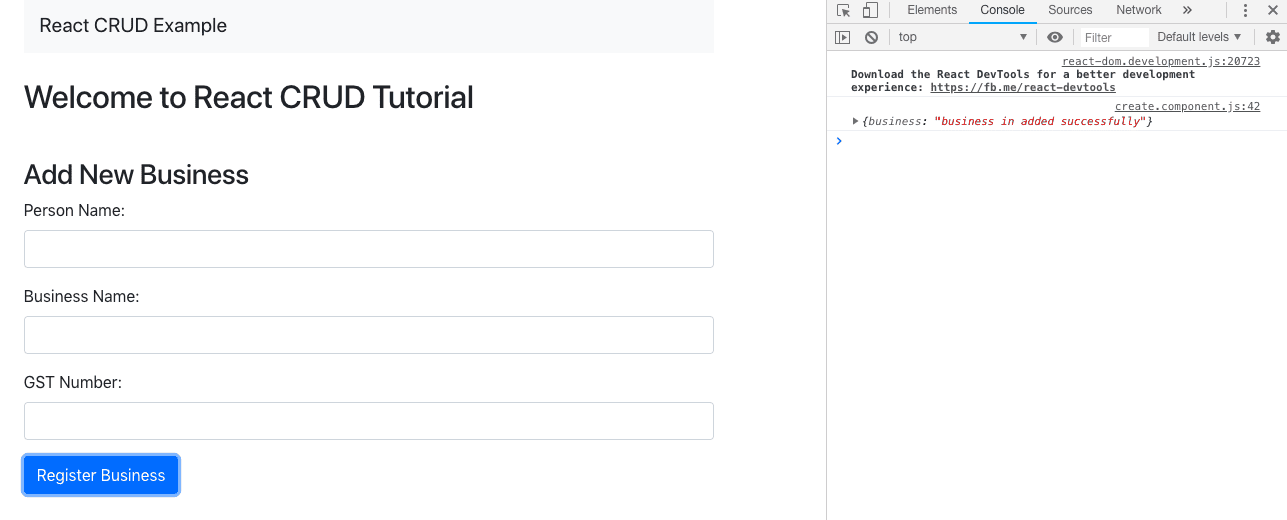
// create.component.js import React, { Component } from 'react'; import axios from 'axios'; export default class Create extends Component { constructor(props) { super(props); this.onChangePersonName = this.onChangePersonName.bind(this); this.onChangeBusinessName = this.onChangeBusinessName.bind(this); this.onChangeGstNumber = this.onChangeGstNumber.bind(this); this.onSubmit = this.onSubmit.bind(this); this.state = { person_name: '', business_name: '', business_gst_number:'' } } onChangePersonName(e) { this.setState({ person_name: e.target.value }); } onChangeBusinessName(e) { this.setState({ business_name: e.target.value }) } onChangeGstNumber(e) { this.setState({ business_gst_number: e.target.value }) } onSubmit(e) { e.preventDefault(); const obj = { person_name: this.state.person_name, business_name: this.state.business_name, business_gst_number: this.state.business_gst_number }; axios.post('http://localhost:4000/business/add', obj) .then(res => console.log(res.data)); this.setState({ person_name: '', business_name: '', business_gst_number: '' }) } render() { return ( <div style={{ marginTop: 10 }}> <h3>Add New Business</h3> <form onSubmit={this.onSubmit}> <div className="form-group"> <label>Person Name: </label> <input type="text" className="form-control" value={this.state.person_name} onChange={this.onChangePersonName} /> </div> <div className="form-group"> <label>Business Name: </label> <input type="text" className="form-control" value={this.state.business_name} onChange={this.onChangeBusinessName} /> </div> <div className="form-group"> <label>GST Number: </label> <input type="text" className="form-control" value={this.state.business_gst_number} onChange={this.onChangeGstNumber} /> </div> <div className="form-group"> <input type="submit" value="Register Business" className="btn btn-primary"/> </div> </form> </div> ) } } Now, submit the form with proper values and open your browser console panel and see the response.
Also, now check inside the MongoDB database and see the values.
To see the values inside the database, we can start a mongo shell and look at the values in the database.
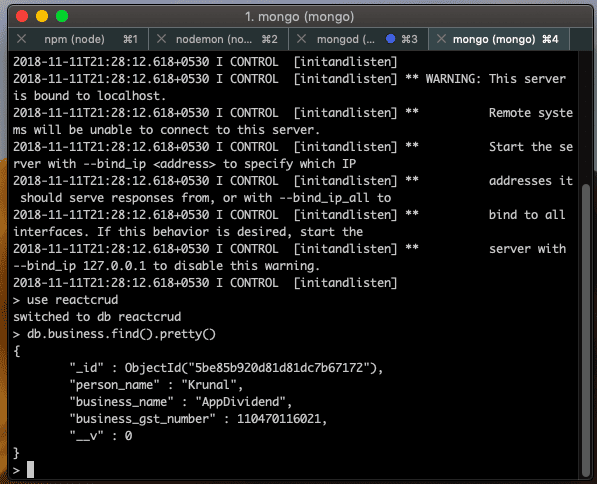
So, we can see that our data is added successfully.
Step 10: How to display data in React js
Write the following code inside theindex.component.js file.
// index.component.js import React, { Component } from 'react'; import axios from 'axios'; import TableRow from './TableRow'; export default class Index extends Component { constructor(props) { super(props); this.state = {business: []}; } componentDidMount(){ axios.get('http://localhost:4000/business') .then(response => { this.setState({ business: response.data }); }) .catch(function (error) { console.log(error); }) } tabRow(){ return this.state.business.map(function(object, i){ return <TableRow obj={object} key={i} />; }); } render() { return ( <div> <h3 align="center">Business List</h3> <table className="table table-striped" style={{ marginTop: 20 }}> <thead> <tr> <th>Person</th> <th>Business</th> <th>GST Number</th> <th colSpan="2">Action</th> </tr> </thead> <tbody> { this.tabRow() } </tbody> </table> </div> ); } } So, here, we have sent the GET request to the node.js server and fetch that data from an API.
We have imported the TableRow.js component. So let us create that component. Then, inside the componentsfolder, create one more component calledTableRow.jsand add the following code.
// TableRow.js import React, { Component } from 'react'; class TableRow extends Component { render() { return ( <tr> <td> {this.props.obj.person_name} </td> <td> {this.props.obj.business_name} </td> <td> {this.props.obj.business_gst_number} </td> <td> <button className="btn btn-primary">Edit</button> </td> <td> <button className="btn btn-danger">Delete</button> </td> </tr> ); } } export default TableRow; This component is responsible for display the row data fetched from the backend.
Save the file and go to the browser and see this URL:http://localhost:3000/index.

Step 11: Edit and Update Functionality in React js
First, add the Link to theTableRow.js file.
// TableRow.js import { Link } from 'react-router-dom'; <Link to={"/edit/"+this.props.obj._id} className="btn btn-primary">Edit</Link> Add the following code to theedit.component.jsfile.
// edit.component.js import React, { Component } from 'react'; import axios from 'axios'; export default class Edit extends Component { constructor(props) { super(props); this.onChangePersonName = this.onChangePersonName.bind(this); this.onChangeBusinessName = this.onChangeBusinessName.bind(this); this.onChangeGstNumber = this.onChangeGstNumber.bind(this); this.onSubmit = this.onSubmit.bind(this); this.state = { person_name: '', business_name: '', business_gst_number:'' } } componentDidMount() { axios.get('http://localhost:4000/business/edit/'+this.props.match.params.id) .then(response => { this.setState({ person_name: response.data.person_name, business_name: response.data.business_name, business_gst_number: response.data.business_gst_number }); }) .catch(function (error) { console.log(error); }) } onChangePersonName(e) { this.setState({ person_name: e.target.value }); } onChangeBusinessName(e) { this.setState({ business_name: e.target.value }) } onChangeGstNumber(e) { this.setState({ business_gst_number: e.target.value }) } onSubmit(e) { e.preventDefault(); const obj = { person_name: this.state.person_name, business_name: this.state.business_name, business_gst_number: this.state.business_gst_number }; axios.post('http://localhost:4000/business/update/'+this.props.match.params.id, obj) .then(res => console.log(res.data)); this.props.history.push('/index'); } render() { return ( <div style={{ marginTop: 10 }}> <h3 align="center">Update Business</h3> <form onSubmit={this.onSubmit}> <div className="form-group"> <label>Person Name: </label> <input type="text" className="form-control" value={this.state.person_name} onChange={this.onChangePersonName} /> </div> <div className="form-group"> <label>Business Name: </label> <input type="text" className="form-control" value={this.state.business_name} onChange={this.onChangeBusinessName} /> </div> <div className="form-group"> <label>GST Number: </label> <input type="text" className="form-control" value={this.state.business_gst_number} onChange={this.onChangeGstNumber} /> </div> <div className="form-group"> <input type="submit" value="Update Business" className="btn btn-primary"/> </div> </form> </div> ) } } So, what we have done is we have used the component lifecycle methodto fetch the data from the API.
That data needs to be displayed inside the textbox because this is an edit form. Next, it is the same thing as we have written the code in thecreate.component.jsfile.
Save the file and go to the edit page from the index or listing page. If the data is not displayed, please check that you have the running node.js server on the backend.

We have also written the code that will update the data because we have written the function to send the request to the node.js server and update the data based on the ID.
Step 12: Delete operation in React
Now, the only thing remaining is to delete the data. First, to define the delete function inside the TableRow.jsfile.
// TableRow.js import React, { Component } from 'react'; import { Link } from 'react-router-dom'; import axios from 'axios'; class TableRow extends Component { constructor(props) { super(props); this.delete = this.delete.bind(this); } delete() { axios.get('http://localhost:4000/business/delete/'+this.props.obj._id) .then(console.log('Deleted')) .catch(err => console.log(err)) } render() { return ( <tr> <td> {this.props.obj.person_name} </td> <td> {this.props.obj.business_name} </td> <td> {this.props.obj.business_gst_number} </td> <td> <Link to={"/edit/"+this.props.obj._id} className="btn btn-primary">Edit</Link> </td> <td> <button onClick={this.delete} className="btn btn-danger">Delete</button> </td> </tr> ); } } export default TableRow; Now, we have completed React CRUD Example or MERN Stack Tutorial From Scratch.
I have put this code on Github. So you can check that code as well.
Finally,React CRUD Example Tutorial is over. Thanks for taking it.
Github Code
Recommended Posts
React Material UI
React Context API
React Datepicker Tutorial
How To Display Images In A Crud Mern App
Source: https://appdividend.com/2018/11/11/react-crud-example-mern-stack-tutorial/
Posted by: churchaceeakell.blogspot.com
0 Response to "How To Display Images In A Crud Mern App"
Post a Comment